Yes, it’s a hell of a title… In this tutorial I’ll show you how to update your WordPress URL so it points to your domain AND install a security certificate so your site address includes https. It’s really easy, and only takes about five minutes.
Just for future reference, this info was written in September 2021. Things may change later on – I’ll do my best to keep this updated but feel free to leave a comment if you see something outdated here!
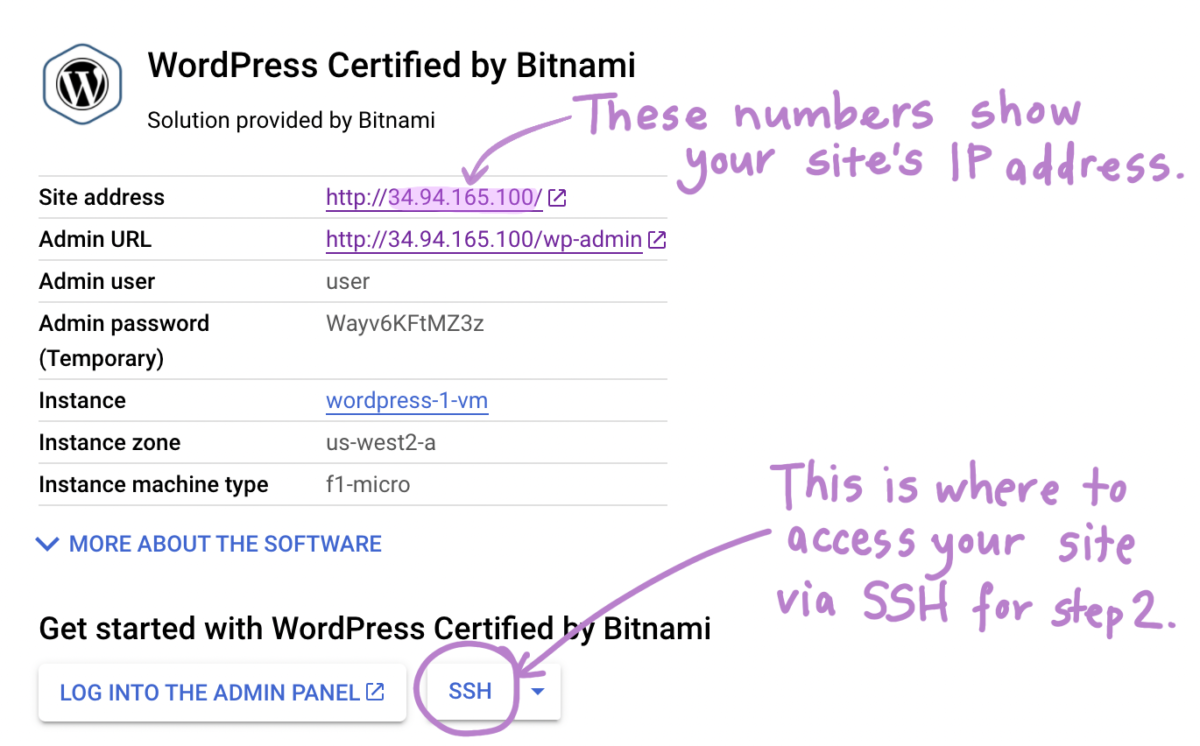
Step one – Ensure that your domain registrar is pointing to your site’s IP address
Your WordPress site is already using your site’s IP address as its URL, so you can just copy and paste from the URL bar in your browser. If you want to double-check, you can see your site’s IP address in the Google Cloud Console by clicking on the upper-left menu > Deployment Manager > Deployments, and then click on your deployment. There you’ll see your IP address on as the Site Address for WordPress.
To point your domain to your site’s IP address, create A Records in your registrar’s DNS settings. Pixel Belle is registered with Google Domains and my setup looks like this:
| Host name | Type | TTL | Data |
|---|---|---|---|
| pixelbelle.com | A | 1 minute | 34.94.165.100 |
| *.pixelbelle.com | A | 1 minute | 34.94.165.100 |
The TTL stands for “time to live” and I set it to one minute so I can get this done fast. You can change it to a longer TTL duration later if you want.
Step 2 – Change your domain name in wp-config.php
Bitnami installations don’t let you configure the domain name in the WordPress backend, so you’ll need to do this via FTP or SSH. I do it via SSH so that I don’t have to mess with folder/file permissions in FTP…
In your Deployment’s page in Google Cloud Console, there will be a little drop-down button thingy that says SSH, click on that and a window will open up with a black background. Welcome to the matrix.
Then we open up wp-config.php so we can edit it. Type this and press enter:
sudo nano /opt/bitnami/wordpress/wp-config.phpThen press the down key until you get to this chunk of text (towards the end of the document):
define('WP_SITEURL', 'http://' . $_SERVER['HTTP_HOST'] . '/');
define('WP_HOME', 'http://' . $_SERVER['HTTP_HOST'] . '/');
Delete those lines and replace them with:
define('WP_SITEURL', 'https://DOMAIN/');
define('WP_HOME', 'https://DOMAIN/');
Change the place where it says DOMAIN to your actual domain.
Exit out of that file (by pressing Command X or Control X, depending on your keyboard settings) and press enter to save the file.
Step 3 – Install a security certificate
Still got the SSH window open? Good. Paste this and press enter:
sudo /opt/bitnami/bncert-toolIt will take a few seconds to get started but soon you should see something that looks like this:

Then, type in your domain twice, once with the www. and once without, separated by a single space, like this:
pixelbelle.com www.pixelbelle.comThen you’ll see three prompts about URL redirection:
1st Prompt – Enable HTTP to HTTPS redirection:
type Y and hit enter to enable http to https redirection.
2nd Prompt – Enable non-www to www redirection:
type n and hit enter – you don’t need your site always going to www.
3rd prompt – Enable www to non-www redirection:
type y and hit enter, so that if someone types www in front of your domain it goes to the “naked” domain.
Then type Y and hit enter to agree to let the program run and make changes to your server. Enter your email address (they never spam you) and type Y one last time to agree, hit enter and it will start generating and installing your security certificate.
Hopefully it worked and you’ll see a message saying “Success” ! In case something doesn’t seem right, you can follow the troubleshooting steps here to reverse any changes you made.
Now, when you type in https://yourdomain.com you should see your WordPress site’s home page and a lock in the URL bar of your browser.
Hopefully this guide met your needs – if it did, I suggest bookmarking it so that you can easily come back to this page in the future if needed.